Purpose of the World Editor[]
(note this page does not say how to interconnect .lvls without bugs)
A Titan Quest mod consists of maps, quests, texts, and a database. The World Editor is where the map part of the mod is edited.
A map consists of one or more levels. Levels may be of the terrain or of the grid type. Terrains are overground, grids are underground or interiors. Terrains may be joined directly to each other. Grids are joined to other grids or to terrains by portals.

|
You may download an up-to-date version of the TQIT toolset from the link below. This will be useful to you if you don't yet own the TQIT expansion set but still would like to contribute to the modding community with your work. Download the zip file below and overwrite the files over the old toolset on your C:\Program Files\THQ\Titan Quest folder
The first versions of the toolset contained several bugs and less features than the updated version. It was especially difficult to mod through the World Editor because of the many crashes. The updated version of the World Editor can still be expected to crash on some machines while browsing through the records. External Link: TQIT Toolset Download broken link, btw |
Starting up the World Editor[]
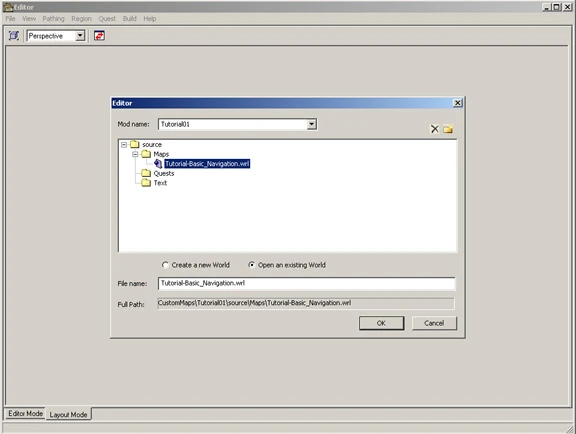
It is neccessary that you have at least created an empty mod with the Art Manager. In the drop down menu at the top of the startup dialogue, select the name of your mod. In the directory structure, navigate to the maps folder. Now create a new map (.wrl) file below. If there is already a map (.wrl) file in your maps folder, you can select it instead.
The World Editor will now start in Layout mode. If this is a new map, it needs to have at least one level added to it. To do so, select 'Add new terrain' or 'Add new grid' from the 'region' menu. You will need to name your .lvl file. The level will now be visible as a box in Layout mode.

|
Due to a bug, it is recommended that immediately after creating every new level you save your work, quit the Editor and restart it.
This bug was fixed with patch 1.11 - added by TohKlidan |
The modes of the Editor[]
There are two possible modes to use when making worlds in the Map Editor, the Layout mode and the Editing mode.
There are two ways to switch between these modes:
- The button with two red arrows
- The tabs in the lower left corner
Normally you switch between the two modes with the tabs. Because the button with two red arrows only appears within the Layout mode. But if you have added a new level to your world it is essential to press the Red Arrow Button. Otherwise your new added level file does not show up in the Editing mode.
In order to work in Editing mode, a level must be selected. You can do this by left-clicking it in layout mode, or by selecting it from a drop-down list in the top right corner in Editing mode.
Layout mode[]
In this mode, you join terrains, make the minimap .tga files of your levels and build the pathing files.
You also hook up Quests to your map in this mode.
Everything else is done in Editing mode.
Editing mode[]
In this mode, you place entities and objects, as well as tiles and walls, paint the textures and change the terrain shape.
You can access the list of the Editor's tools in Editing mode.
Saving your work[]
The Art Manager needs three files for each level to build them into a map. The .lvl file proper, containing everything you created in Editing mode, a .rlv pathing file, and a .tga graphics file for use with the map feature and the compass in-game.
To make a pathing file, you select 'Rebuild all Pathing' or 'rebuild selected pathing' from the 'build' menu in Layout mode.
To make a minimap file, you select 'Rebuild all Maps' or 'rebuild selected maps'.
To make the level file proper, you select 'save all' or 'force save all' from the 'file' menu.