Preparations[]
Get a copy of the TEX Viewer (© Max McGuire) and of the ARC Explorer (© 2006 Benjamin Haisch).
Next use the ArchiveTool or ARC Explorer to get /teleportmap/worldmap01.tex out of InGameUI.arc. View it with the TEX Viewer and export it and change it in your painting program. Save your changed version in .tga format. Fortunately the worldmap image doesn't have the HUD border included, as it is in the questmap image. So you don't have to cut out the borders. Open your Artmanager and import your new map. Right click on your imported image and select "Create Auto Asset" and choose bitmap as asset type. Now your tex file appears in your assets tab. Build your tex file.
Step 1 - Art Manager - Import resources[]
- records/ingameui/teleportmap/greecebutton.dbr
- records/ingameui/teleportmap/zones/greece/helos.dbr [2]
- records/item/shrines/teleportgreece/teleportshirnehelios01.dbr
↑ 1. This import may not renamed or moved!
↑ 2. This import can be renamed but you may move it only within the /records/ingameui/teleportmap/zones/ folder. I'll describe later why.
Step 2 - Art Manager - greecebutton.dbr[]
Edit config->texttag, insert your reference tag (modstrings.txt) The button is used to switch between the regions (Egypt, Greece, Orient in original. TQ) and displays the name of it. Save. Right click. Build.
Step 3 - Art Manager - Getting your zones ready[]
For each teleporter you want to place within your world, you have to make a copy of this zone draft. Open your copy of helos.dbr

Reference your ZoneNameTag and your TeleporterNameTag from your ModString.txt.
The mapIndex is a value between 0 and 3 and depends on the folder in which the zone button appears.
Normaly it is set to 0 cause we used a greek zone as draft.
Now switch to the widget tree:
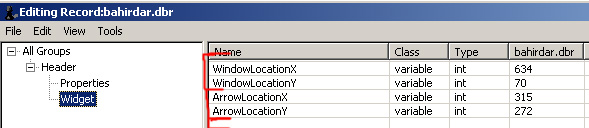
The windowLocation is the position for your button window overlay.
The X-coord remains as it is.
The Y-coord begins with 70 and for each additional zone button it is raised by 60.
The ArrowLocation is the coord that points on your worldmap if you hover your mouse pointer over the button.
Save. Right click. Build.
Step 4 - Art Manager - teleportmap.dbr[]
Open your copy of teleportmap.dbr Switch to the WorldWindow tree:
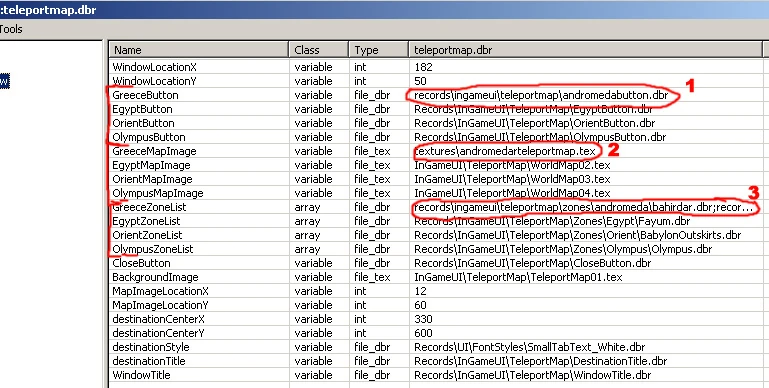
1- reference here your copy of greecebutton.dbr
2- reference here your worldmap tex file.
3- reference here all your zones (copies of helos.dbr) with mapindex value 0. Zones with mapindex value 1 are added to the EgyptZoneList and so on.
It is possible to add up to 4 portalmaps in your mod. Save. Right click. Build.

|
Important:
Do not rename or move this dbr, otherwise it is not found by the game engine. |
Step 5 - Art Manager - Preparing your shrines[]
Open your copy of teleportshirnehelios01.dbr.

1- reference here the same tag you used for TeleporterNameTag in step 3.
2- you may also change the mesh to change the appearance of your teleporter.
For each zone you created in step 3, you have to create a shrine.
Save. Right click. Build.And now also use the F7 Build.
Step 6 - World Editor - Painting Zones[]
Open your mod and world. Switch to Editing mode and select the Layer tool.
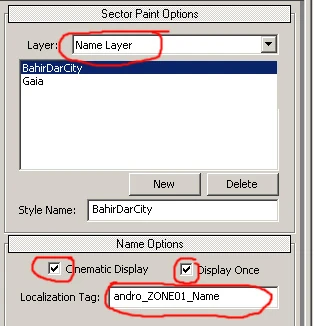
Select Name Layer as Layer.
Add as many layers as you wish. This can be more than you need for your teleporters. Reference each layer with your tag from your modstring.txt in the Localization Tag field. Use the same tag here as you used for TeleporterNameTag in step 3, if you have a teleporter for this area.
If you check the Cinematic Display option, the name appears int the middle of the screen if you enter the zone. The Display Once option is for displaying the cinematic display only once. Also the name of the zone is shown besides the minimap.
It is necessary to draw your name layers everywhere the player can walk inside the zone, else the zone names are not correctly updated if he uses his personal portal.
Step 7 - World Editor - The Zone view[]
Switch to the Layout mode and Toggle Zone View on (found in the Region Menu) Now you see a list of all zones you created as layers, and also the first zone of each region selected in the teleportermap.dbr
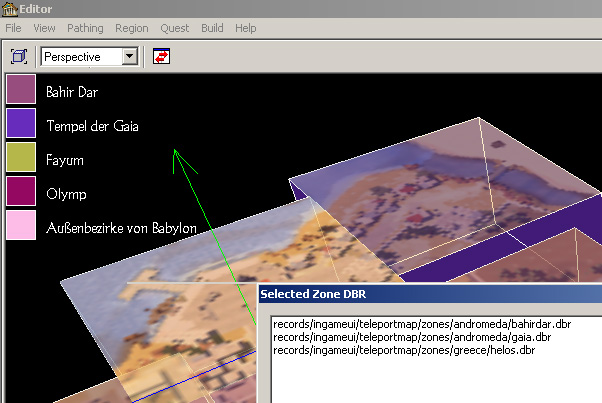

Now select each of your levels and select from the Menu Region->add to zone.
And now you see that the editor only scans for zone files in /records/ingameui/teleportmap/zones/ and its subfolders. This is why you can't move the database entry for the zones, like it was mentioned in step 1.

|
If there are no SelectedZone DBR files available from the list in the window :
1] Copy the \records folder of the MOD in the \Database folder of the game. ex: copy \My Games\Titan Quest - Immortal Throne\Working\CustomMaps\MOD name\database\records in C:\Program Files\Games\Titan Quest Immortal Throne\Database 2] The records of the regions buttons (SelectedZone DBR, ex: Pelion.dbr) will be available and selectable. DELETE this \records folder from the game's \Database folder when the MOD is built to avoid any conflict with database.arz |
Select one of your teleporter zones for each level. This step is important for your personal portal (the L hotkey in the game). Only by adding all your levels to a zone dbr the personal portal knows where it must appear in the teleporter window. Otherwise it crashes or you can't teleport back. So there are two types of "name layers" the one which where only used for displaying a name on the screen, and those which are important for your personal teleporter. In addition, Grid Regions also have to be added to a zone!
For Example: You have Alexandria and Alexandria Outskirts as name layers. but only a teleporter shrine in Alexandria. Then you have to add your Outskirts in the zone view to Alexandria.
Step 8 - World Editor - Placing and Linking Portals[]
Place your Teleportershrines (created in step 5) on your map.

Switch to the Group Tool.
Add a new group for your teleporters. Name your group and select TeleportShrine as type. Add all your teleporters to this group. Begin with the nearest to the players spawn point. Switch to the next and go on. As you can see all your teleporters are now connected with a red line.
Save your level. Rebuild all maps. Rebuild all Pathes, and save again.
Step 9 - Art Manager - Build and Test[]
Now step back to the Artmanager and use the F7 Build function for the changes you made in your wrl and lvl files.
Start your mod in the game and here is your fully functional teleporter.

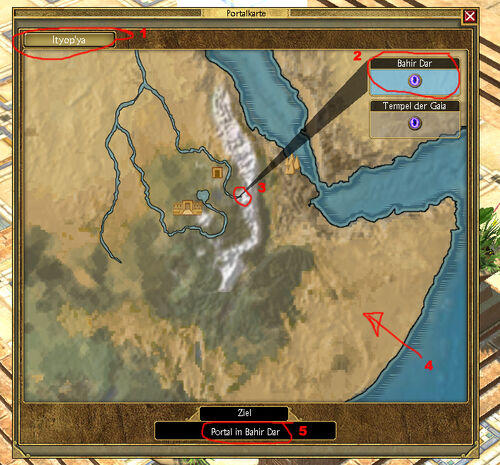
Your finished Teleporter map.
1-your copy of records/ingameui/teleportmap/greecebutton.dbr
2-your copy of records/ingameui/teleportmap/zones/greece/helos.dbr
3-the arrow location of step 3
4-your GreeceMapImage of step 4
5-Portal Name of step 5